During Measure Phase the overall performance of the Core Business Process is measured.
There are three important part of Measure Phase.
(1) Data Collection Plan and Data Collection
A data collection plan is prepared to collect required data. This plan includes what type of data needs to be collected, what are the sources of data etc., The reason to collect data is to identify areas where current processes need to be improved.
You collect data from three primary sources: input, process, and output.
- The input source is where the process is generated.
- Process data refers to tests of efficiency: the time requirements, cost, value, defects or errors, and labor spent on the process.
- Output is a measurement of efficiency.
(2) Data evaluation:
 At this stage, collected data is evaluated and sigma is calculated. This gives approximate number of defects.
- A Six Sigma defect is defined as anything outside of customer specifications.
- A Six Sigma opportunity is the total quantity of chances for a defect.
First we calculate Defects Per Million Opportunities (DPMO) and based on that a Sigma is decided from a predefined table:
                   Number of defects
DPMO =   ------------------------------------------- x 1,000,000
           Number of Units x Number of opportunities
As stated above, here Number for defects is total number of defects found, Number of Units is the number of units produced and number of opportunities means the number of ways to generate defects.
For example: The food ordering delivery project team examines 50 deliveries and finds out the following:
- Delivery is not on time (13)
- Ordered food is not according to the order (3)
- Food is not fresh (0)
So now DPMO will be as follows:
         13 + 3
DPMO = ----------- x 1,000,000 = 106,666.7
         50 x 3
According to the Yield to Sigma Conversion Table given below 106,666.7 defects per million opportunities is equivalent to a sigma performance of between 2.7 and 2.8.
This is the method used for measuring results as we proceed through a project. This beginning point enables us to locate the cause and effect of those processes and to seek defect point so that the procedure can be improved.
(3) Failure Mode and Effects Analysis – FMEA:
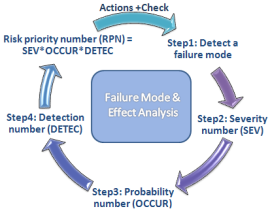
 The final segment of the measure phase is called FMEA. This refers to preventing defects before they occur. The FMEA process usually includes rating possible defects, or failures, in three ways:
- The likelihood that something will go wrong.
- The ability to detect a defect.
- The level of severity of the defect.
You may use a rating scale. For example, rate each of these three areas from 1 to 10, with 1 being the lowest FMEA level and 10 being the highest. The higher the level, the more severe the rating. So a high FMEA would indicate the need to devise and implement improved measuring steps within the overall process. This would have the effect of preventing defects. Clearly, there is no need to spend a lot of time on this procedure if the likelihood of a defect is low
Yield to Sigma Conversion Table
| Yield % | Sigma | Defects Per Million Opportunities |
| 99.9997 | 6.00 | 3.4 |
| 99.9995 | 5.92 | 5 |
| 99.9992 | 5.81 | 8 |
| 99.9990 | 5.76 | 10 |
| 99.9980 | 5.61 | 20 |
| 99.9970 | 5.51 | 30 |
| 99.9960 | 5.44 | 40 |
| 99.9930 | 5.31 | 70 |
| 99.9900 | 5.22 | 100 |
| 99.9850 | 5.12 | 150 |
| 99.9770 | 5.00 | 230 |
| 99.9670 | 4.91 | 330 |
| 99.9520 | 4.80 | 480 |
| 99.9320 | 4.70 | 680 |
| 99.9040 | 4.60 | 960 |
| 99.8650 | 4.50 | 1350 |
| 99.8140 | 4.40 | 1860 |
| 99.7450 | 4.30 | 2550 |
| 99.6540 | 4.20 | 3460 |
| 99.5340 | 4.10 | 4660 |
| 99.3790 | 4.00 | 6210 |
| 99.1810 | 3.90 | 8190 |
| 98.9300 | 3.80 | 10700 |
| 98.6100 | 3.70 | 13900 |
| 98.2200 | 3.60 | 17800 |
| 97.7300 | 3.50 | 22700 |
| 97.1300 | 3.40 | 28700 |
| 96.4100 | 3.30 | 35900 |
| 95.5400 | 3.20 | 44600 |
| 94.5200 | 3.10 | 54800 |
| 93.3200 | 3.00 | 66800 |
| 91.9200 | 2.90 | 80800 |
| 90.3200 | 2.80 | 96800 |
| 88.5000 | 2.70 | 115000 |
| 86.5000 | 2.60 | 135000 |
| 84.2000 | 2.50 | 158000 |
| 81.6000 | 2.40 | 184000 |
| 78.8000 | 2.30 | 212000 |
| 75.8000 | 2.20 | 242000 |
| 72.6000 | 2.10 | 274000 |
| 69.2000 | 2.00 | 308000 |
| 65.6000 | 1.90 | 344000 |
| 61.8000 | 1.80 | 382000 |
| 58.0000 | 1.70 | 420000 |
| 54.0000 | 1.60 | 460000 |
| 50.0000 | 1.50 | 500000 |
| 46.0000 | 1.40 | 540000 |
| 43.0000 | 1.32 | 570000 |
| 39.0000 | 1.22 | 610000 |
| 35.0000 | 1.11 | 650000 |
| 31.0000 | 1.00 | 690000 |
| 28.0000 | 0.92 | 720000 |
| 25.0000 | 0.83 | 750000 |
| 22.0000 | 0.73 | 780000 |
| 19.0000 | 0.62 | 810000 |
| 16.0000 | 0.51 | 840000 |
| 14.0000 | 0.42 | 860000 |
| 12.0000 | 0.33 | 880000 |
| 10.0000 | 0.22 | 900000 |
| 8.0000 | 0.09 | 920000 |


Good work.I think this is a very good knowledge site for Six Sigma for both Students & Professionals.Thanx….& Keep it up..
Yes…Online & Software Store is also very Nice particularly Six Sigma for Managers..
Good Knowledge Site on Six Sigma for both Students & Professionals..
Yes..Online & Book Store is also very nice Particularly Six Sigma For Managers..Thanx…
Good Knowledge site on Six Sigma for both Students & Professionals.Also Online software & book store is also nice Particularly Six sigma for managers…thanx…